The website allows editors to create individual articles and later compile them into a curated list or digest. The list of articles is then sent as a newsletter to subscribers who have opted in to subscribe.
- Ideal For:
- Regular updates or weekly/monthly digests.
- Sharing the latest or most popular articles.
- Providing a snapshot of diverse content pieces.
- How It Works:
- Write and publish articles individually.
- Periodically select and bundle relevant articles into a newsletter.
- Send this compilation to subscribers at set intervals.
Example: A technology blog publishes 5 articles a week. At the end of the month, the editor compiles the most-read articles and sends them as a digest to subscribers.
How to Send Article-Based Newsletter
To add newsletter subscription to your website:
- Submit a website project request with the URL to the page you would like the subscription form added.
- Special training is required to gain access to send newsletters for your unit. Make sure to include the editors name in the website request that needs access to manage your email subscriptions and send newsletters.
- If you have previous contacts you would like imported to your list, make sure to include your file with the email addresses.
Subscribe to a Mailing List
Visitors can subscribe to any newsletter by visiting the page with the subscription block and entering their email address.
See a full list of available Newsletters and subscribe.
Managing Subscriptions
If an anonymous user wants to view and manage their subscriptions, they can do so by clicking the Manage subscriptions link under any subscription form on the site.
They will be prompted to enter a title to name their subscription and their email address.
They will receive a confirmation message and an email will be sent with your subscription information.

They will then be provided a link via email to access and manage your subscriptions.
Send Out a Newsletter
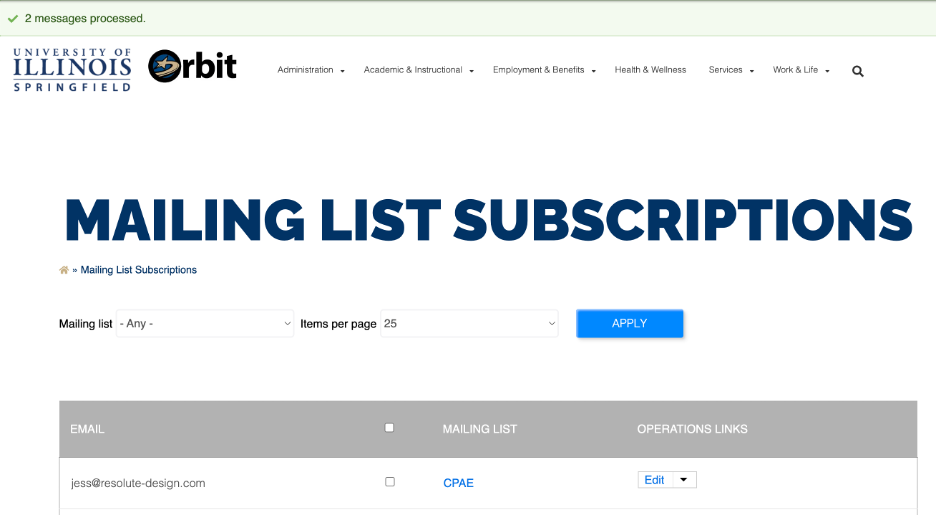
Once you have a mailing list setup, you can email the list by visiting the Mailing List Subscriptions page, selecting your list from the dropdown. Click the individual emails or select all by clicking the box in the table header. Then click the Next button under the table.
The website processes the emails in batches to prevent performance issues.

You will then be presented with a form to enter your email text.
- Update the Sender’s name and email fields to your unit contact information.
- Under Recipients, update the Field used for Recipients name and email to ‘Email (email)’ for both. If you don’t set a value for the name, you will receive an error on send.
- Add subject.

For the Message section, you have the option to change the text format from Plain text to FULL HTML.
FULL HTML is required to if you want your email sent in HTML.
You can manually type in your newsletter content in the message window or use the instructions below on how to export your latest news.
You can also attach a file if desired. Make sure the document is optimized for the web before sending to prevent issues.

Get Code of your Latest News for Newsletter
Grab a copy of the of the HTML for the latest news articles for export, and filter down by your department and desired dates.
Click the orange CSV button at the bottom of the feed to download the exported article HTML.

Add the title of the newsletter in the Message field and change the style from paragraph to Heading 1.
Then click the Source button.

Open the downloaded CSV file in your computer text editor (or something equivalent) to grab the source code of your articles. Select All, and copy the text.

Then paste the code into the Message window (make sure you selected ‘Source’) under the heading you added. By default the export includes ‘newsletter’ text at the top of the file, which should be deleted before or after copying over the code.

Click the ‘Source’ button again to see the visual representation of the content.

Scroll to the bottom of the page. Leave the ‘Send the message directly using the Batch API’ checked.
By default, it also has the option to ‘Send a copy of the message to the sender’ which can be unchecked if you don’t want to receive a copy.

Then click the blue ‘Next’ button at the bottom of the form.
You will receive a page to preview the email. Click the ‘Send’ button to send your newsletter email(s).

You will receive a confirmation message if the emails were sent and it will take you back to the main mailing list subscription page.

NOTE: The form to send emails may will throw an error if you do not include a Senders Name. It will also throw an error if you attach an unapproved file type.